FORAY - Tutorial: Controlling multiple control boards through game controllers
Zhaoliang ZhengAuthors: Parth, Zhaoliang
The details can be found in the github
Motivation
Previously, we introduced about how to control multiple WIFI-based control board through Blynk app. Though it's also convenient, it has two main drawbacks:
-
The local Blynk server requires devices to have different authorization token every time when people reboot the Blynk server, which means that we have to upload new "Auth token" to our devices.
-
Blynk app is basically an app, everything on that app is all virtual, including buttons, sliders, joysticks. So, it doesn't even have physical feedback, which will make control through hand really hard and force people to watch the interface.
Overview
The overall process flowchart:

The flowchart shows the step-by-step process, from the every begining to the final control.
Program structure and introduction
There are 5 main programs that people should care about:
-
Controller mapping program: controller_test.py
- controller_test.py is to test the mapping relationship between game controller and their corresponding relationship
-
MAC address programs: MAC_esp32.ino and MAC_esp8266.ino
- MAC_esp32.ino and MAC_esp8266.ino is to get the mac address from ESP-32 based control board and ESP-8266 based control board
-
Master control board programs: Esp8266_master.ino and Esp32_master.ino
- These programs should be uploaded to the master control board that controls different slave control boards.
-
Slave control board programs: Esp8266_slave.ino and Esp32_slave.ino
- These programs should be uploaded to the slave control boards that is controlled by master board
-
Joystick program: Joystick.py
- Joystick.py is to interpret input data from game controllers and send these data to the serial port. It should be running while we're using game controllers as control inputs.
Requirements
Hardware requirements:
- A laptop that runs Windows 10 or Ubuntu 20 (haven't tested MACbook yet)
- A XBox game controller
- A NodeMCU-Esp8266 as the master board
- Several NodeMCU-Esp8266 as slave boards
- One USB to Micro-USB cable that connects the master board with your laptop
Software requirements:
-
pygame library
- Use one of the following commands:
pip install pygame
pip3 install pygame
Process
There are four main steps:
-
Initialization:
- if you use a new XBox game controller, it's recommended that your initialize it for the first time and check if your game controller match the one that I used.
- If you use a game controller that is not Xbox, then you must initialize it for the first time.
- If you have run this step before and know the mapping already, then you can just skip this step.
-
Get MAC address:
- MAC address is unique for each edge device, if you don't know the MAC address of your edge devices, then you need to run this step
- If you already know the MAC address of your edge devices, then you can just skip this step
-
Program upload to edge devices
- Master program has to be uploaded to the master board
- Slave program has to be uploaded to the slave board
- If you already finish this step and you don't want to change anything (add more devices to be controlled by master board), then you can just skip this step
-
Operation and execution
- This step is to control your slave edge devices through game controller
Initialization
-
Plug in game controller
-
You need to install pygame lib first before you run this program
-
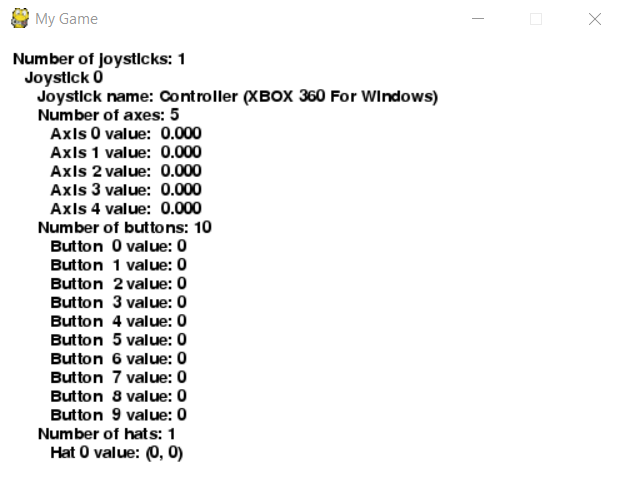
Run controller_test.py program
- You'll see a window pup up like this:
-
Now, press each buttons and joystick on your game controller at one time and notice the number change on the above windows.
-
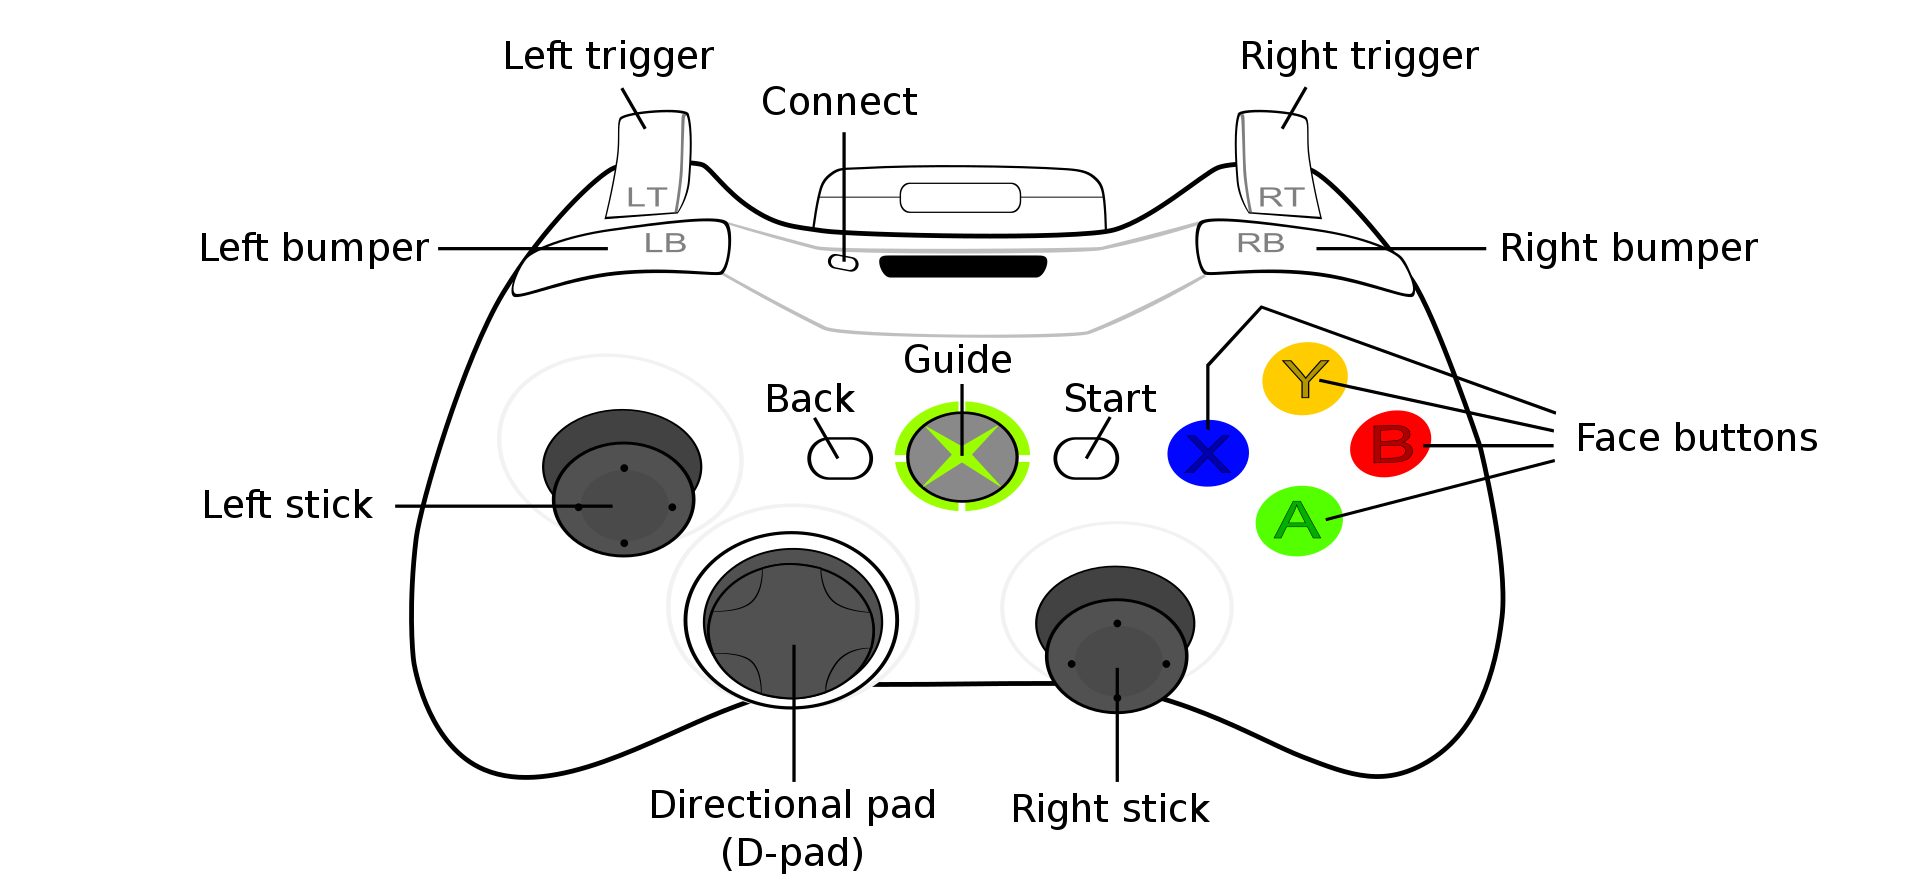
The normal XBox game controller should look like this:
-
Now, try to match the buttons and its physical buttons using the following tables: (The values are the example of my controller)
Button_name Value Left_stick (left,right) Axis 0 (-1,1) Left_stick (up,down) Axis 1 (-1,1) Left_trigger Axis 2 (0.996) Right_trigger Axis 2 (-0.996) Right_stick (up,down) Axis 3 (-1,1) Right_stick (left,right) Axis 4 (-1,1) A button 0 (0,1) B button 1 (0,1) X button 2 (0,1) Y button 3 (0,1) Left_bumper button 4 (0,1) Right_bumper button 5 (0,1) Back button 6 (0,1) Start button 7 (0,1) Left_stick_button button 8 (0,1) Right_stick_button button 9 (0,1) D-pad (Left,right,up,down) Hat 0 (-1,0) (1,0) (0,1) (0,-1) -
Write down the mapping value on this table, we will need this later.